Digitizing slides - A DIY project for photo geeks
Like many others, I have slide magazines filled with old memories piled up in a closet in the basement. Of course not all slides are worth preserving, but some are. There are inexpensive digitizing services available today. However, I first would have to sort out the slides that are worth preserving. That means I would have to go through every magazine. If I take this time, I could as well digitize the slide in question myself. What would be a good and fast technique to tackle this?
The first thing to do is to define the quality requirement. I have been taking pictures since 1968 with Nikon SLR cameras and good lenses, slides at that time preferably on Kodachrome II film, later also on Ektachrome 400 ASA. The former was famous for its high resolution, the latter for its prominent grain. I would like to be able to transfer either one into the digital version. The bottom line is that the reproduction technique should reach a resolving power of at least 3000 dpi, preferably better. But I am afraid that because of the high contrast range of a slide, a digitizing range of 8 bits (256 steps) could be too narrow. With 8 bits of dynamic range one would loose fine details in the shadows.
If one decides for the digitization DIY, and considers the technical possibilities, time and space requirements, one arrives at a 3-step workflow: 1. devise a meaningful file naming system and a suitable file storage tree - 2. look through the collection with the slide projector and sort out the slides worth preserving; possibly label them for later use - 3. digitize sorted slides.
My negative and slide scanner "Nikon Super Coolscan 5000 ED" scans with 4000 dpi in 16 bit. With Nikon scan software the quality is very good for black and white and color negative material, but a scan takes about 1 minute. Slides are digitized with good resolution, but I did not manage to get directly satisfactory colors and contrasts with the Nikon scan software. I had to post-process each image in Photoshop. On the other side the scanner offers the eycellent "ICE 4" technique for scratch suppression that could save post processing time. However, those who were careful with their slides will hardly have any scratches. In this sense, the Coolscan 5000 ED set the quality standard with which alternative processes are compared with.
Slide reproduction with flatbed scanner with transparency unit
Flatbed scanners are optically and electronically optimized for images on paper in formats up to DIN A4. In terms of resolution and contrast range, slides require more of both. The density range of a slide can quickly reach 8 EV (f-stops), which corresponds to a contrast range of 1:256, while a paper image with a dynamic range of 6 EV, 1:64, already represents the upper quality level. The brightness signal on the scanner line sensor is defined by the illumination source, whereas the dark sensitivity is limited by the detector noise. For the light sources and scanner detectors used, these are the limiting factors.
Another factor that has a negative effect on film scanning is the shallow depth of field of the scanning optics. To achieve the specified resolution, the scan original must lie exactly in the scanning plane. On the other side, slides, especially framed ones, are often rather curved.
With the best flatbed scanners, such as those in the Epson V700 to V850 family, usable results can be achieved, as Thomas reports. I myself have a Canon CanoScan 9950F. My impression is that flatbed scanners cannot extract the quality contained in a good analog slide.
Slide reproduction with venerable 1970 Mannesmann Multiblitz Color slide duplicator and a camera on a copy stand
Today with luck a used Multiblitz box can be found in the internet. It is designed for slides of 6 cm x 7 cm and smaller. It contains a continuous light source for focusing and an electronic flash source for exposure. Mannesmann was a respected manufacturer of studio flash units. Even though the unit is almost 50 years old, you don't have to worry about ruining your digital camera sync electronics with high voltage levels on the contact.

It would be the ideal device if the strong flash output could be adjusted. With the Micro-Nikkor 2.8 105 mm, I had to stop down to 32 to avoid overexposure at ASA 100. At aperture 32, however, diffraction blur visibly reduces resolution. One could help oneself with ND filters in front of the lens. But then the focusing light is too dark. Adding a ND-glass filter at magnification 1:1 will shift the plane of best focus so reducing sharpness. Putting the ND film below the slide could help. However, the slide holder should be stable while manipulating the filter between focusing and exposure. The device does not offer thispossibility. In any case, both filtering methods result in fiddling with the setup, which can affect sharpness.
Projector-based methods: Imaging the slide from the projector with a digital camera.
1 Photograph projected image from the screen.
Quality is determined by the projection optics and the reflection behavior of the screen/projection surface.
>> Unsatisfactory: resolution poor, every inhomogentity of the projection surface (waves, "pearl structure", tissue structure, etc.) is visible in the digitized image.
2 Photographing through the projection lens into the projector
Due to the illumination beam path in the projector (condenser projects an image of the halogen light source into the projection lens), the reproduced image has a strong light fall-off to the outside. >> Indisputably unsatisfactory.
3 Modification of the condenser, photographing the slide without projection lens
Without a projection lens, the slide is recorded directly with the digital camera. However, the condenser images the light source close to the camera lens resulting in an excessive vignetting effect. The optical function of the condenser can be neutralized by inserting a diffusing screen (opal glass plate cut to fit by the local master glazier) between the heat protection filter and the slide. Theoretically this is OK. Practically you have the following problems: The 150 watt halogen bulp generates considerable heat. Despite heat protection filter, hot convection streams will bend the slide film - the famous "blopping" effect . To render slide center and corners equally sharp requires f-stop 22 or more, which is detrimental to the sharpness of the image. Also the halogen lamp, 150 watts, must be cooled by a fan. The imbalance of the fan blades causes vibrations which blur the image. NB. : The position of the slide must be stable within one digital pixel in the exposure time. With a 40 MB camera at a reproduction scale of 1:1, this corresponds to only about 4.8 thousandths of a millimeter! >> In sum, these points lead to an unsatisfactory result.
4 Modified projector: Replace halogen lamp condenser with opal lamp
If the condenser and the halogen lamp are replaced with an opal bulp (the ones usually used in enlargers) directly behind the slide, a very homogeneous illumination can be achieved. To do this, the projector cover must be removed. Since no hot halogen lamp has to be cooled, the fan does not have to run. No vibrations. However, one must then limit oneself to manual slide transport. An experimental setup is shown in the picture below. If one focus carefully (live view!), expose with the mirror up and optimize the white balance manually, images that show at least as much detail as the Coolscan 5000 ED images, but with crisper colors and contrast can be obtained. >>All in all: very usable.

BUT: Without cover on the projector, the slide transport mechanism no longer works properly. The cover usually has an extra slide guide rail that ensures that even cardboard-framed slides are correctly pushed into position. Without this cover the slides get jammed. So an important advantage of projector-based slide reproduction - the fast slide change - is lost.
Reproduction with modified stand and diffuser box
Since none of the discussed methods is convincing in practice, I came back to the traditional copy stand method.
Now, copy stands, like the one pictured above, are wobbly. But, as do-it-yourself makers know, a drill rig in which a hand drill is clamped can be very stable. A particularly sturdy and also inexpensive rig is Proxxon's BFB 2000 mill/drill unit. It features a collar for hand drills with a 43 mm spindle neck. I had an adapter made for it that fits into the 43 mm collar, and to which a camera can be attached by means of a ¼"-UNC tripod screw; see figure below.
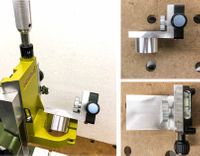
Nothing wobbles on this rig! it also features a precisely adjustable, virtually backlash-free carriage that can be adjusted in height with 0.1 mm precision using a set screw in the rig's milling mode, which saves a separate focusing rack for the camera.
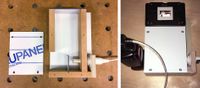
As an illumination source for the slides, I built a small diffuser box from leftover pieces of MDF and Dibond, which ensures very homogeneous illumination. I coated the inside of the box with Blanc Fix (baryte white, barium sulfate, barite) (recipe see here). For this purpose here, a titanium dioxide dispersion paint (wall paint from the hardware store) would probably be white enough. A G9 LED lamp shines into the box on one side as a focusing light. The opposite side has an opening for a flash to shine into. My experience is that for macro photography, flash lighting results in sharper images than continuous lighting (short exposure time!). Flash also has an emission spectrum that provides a reliably reproducible white balance. I connect the flash to the camera with a TTL hot-shoe cable and get well-exposed slide prints.
Lenses: On my Nikon D800 I tested the AF-S Micro-Nikkor 105mm f/2.8G, a Micro-Nikkor 55mm f/2.8 with PK-13 extension ring, and a Rodenstock Apo-Rodagon 50mm f/2.8 enlarger lens in a focus capture. At the magnification scale of 1:1, I obtained the sharpest reproductions with all three at f/5.6, and the sharpness at least matched the one of the "Nikon Super Coolscan 5000 ED" slide scanner. The visibly sharpest reproductions were achieveded with the 55mm Micro-Nikkor. I bought my copy in 1979, Nikon still manufactures this model today - no wonder, it is super sharp!
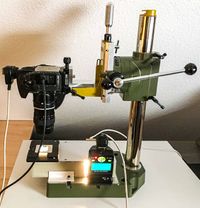
I obtained the best experience with above setup: mechanically very stable, precise, reliable, excellent reproducibility, and changing slides is sufficiently nimble.
I remotely control the camera via a USB thethering cable via Capture One software which, like Lightroom Classic, has remote control features built in. For flash, I use my Nikon Speedlight SB-800, which is connected to the camera with a Nikon SC-28 equivalent cable. This provides TTL flash control of the exposure.
Focusing (open aperture!): I have not had good experiences with live view. Because of the limited number of pixels displayed, best focus is difficult to find. Remark about the Live-View mode of Nikon DSLR cameras: In the camera modes M and A the Live-View occurs at working aperture! This is not a Nikon bug but a feature that should be considered in this application here. Other cameras may behave differently in this regard. Unfortunately, one can not fully rely on the focus indicator in the camera view finder. Its tolerance is considerable. I got the most reliable focus setting when I took a series of pictures (aperture fully open!) changing the distance by 0.2 mm with the adjustment screw on the rig (always approach from the same side!). Inspecting at 200% magnification on the computer screen, the best focus setting is clearly visible. So the sharpness in the corners and the center of the image can be compared as well.
Exposure (stop down lens 2 stops!): With the histogram tool of the tethering software, the exposure can be immediately evaluated and corrected if necessary. I always expose so that the right end of the histogram just does not show any highlight erosion (ETTR rule - expose to the right). With this diffuser box, the camera sensitivity can be safely set to the base sensitivity of the sensor so obtaining the best dynamic range the camera can offer. With the D800 this is 200 ASA. During several days and several hundred slides of work with this setup there was no need to refocus!
Finally, a few remarks about working distances. Unfortunately I can't get around using some formulas here. As my content management system can not deliver a satisfying formula display I . Therefore I edited that part for download here:
 | Remarks on Working Distance Rem_WorkingDistance.pdf (186.29KB) |
| Rem_WorkingDistance.pdf (186.29KB) |