Making your own photo book - another DIY project
v. May 30, 2024
Why a photo book
Ever since mobile phones have a built-in camera, the number of photos taken has increased rapidly. It is said that an average of over 1000 pictures are stored in a mobile phone in Germany. One might ask: What relationship the "phone user" might have to his pictures? This is difficult to analyse. As I have observed, the relationship seems to be mostly a "flinging" one: The picture pages in the mobile phone are flinged away rather than carefully turned. Suspicion arises that some of the pictures deserve more affection. One might wish to hold those images in a tangible form in the own hands or as a object on the wall. However, not every photographer has access to a gallery where his/her pictures can be viewed and touched. This is where the idea of a photo book comes up. In this project I describe how to realize photo book. But if ever considered, we should not harbour any commercial expectations with this project. Very rarely has a photo book become a bestseller. "While the photo books of a few stars from fashion and nude photography may reach five or even six-figure print runs worldwide, the rest of the photographers hardly ever get beyond a magical limit of eight hundred copies sold, often considerably less" (Freddy Langer, Frankfurter Allgemeine Zeitung, 30 October 2023, No. 252, p. 13). I would therefore like to leave it here as a purely private endeavour for enthusiasts, which should nevertheless be approached with a certain ambition on craftsmanship and aesthetic quality.
Back to the photo book as a substitute for an exhibition. One quickly realizes that a viewer perceives these two situations very differently, and so is left with different sentiments. The difference is not even a result from the different sizes of the images. If one takes the viewing distance into account, the perceived size can be similar in both cases. No, in a gallery the walls generate an intrinsic, special reality of perception to stage a picture presentation. Also the walls define a space of a certain size in which, for example, by an intelligent arrangement visual concepts can be revealed. You can participate on this stage with your whole body, take in the presentation, cross it, and leave it. A book, however, requires only a small movement of the forearms to open. And there are exactly two pages facing each other that form the stage. So, a photo book creates a reality with its own space of perception and therefore its own rules. It is also about typography, the feel of the paper, the cover material, and the way it is bound. It is inspiring to see which ideas, statements and content have been assembled on this paper stage. A good place to do this is in Cologne: the PhotoBookMuseum,. Also in numerous exhibition centres that have a photo collection, such as the Museum Folkwang, the Fotografie Forum Frankfurt, the fotomuseum winterthur, and many more, you can find libraries and museum shops with stimulating photo books.
In this essay I will exclude discussion about photographic content. I assume that the author has developed a visual concept for the content of the book taking into account mentioned stage-context. So now, the images have been selected and the text has been formulated. The project is ready to start. We will work with the modest technical and manual means in reach of a photographer. Constraint by these prerequisites, we will make the formal decisions. The tools and aids in the photo studio are usually limited to an image editing program (e.g. Photoshop), a photo printer (e.g. an inkjet printer like the Epson SureColor P-800/900 and successors), cutter knifes, steel ruler, folding bone and, if the concept should contain extensive text passages, possibly a layout program (such as InDesign or Scribus). We want to create a collection of images that you like to hold and touch, a collection of images that you don't want to fling. ...and if for extravagant ideas for the cover design we can call on the help of a master bookbinder.
At the beginning: Thinking about the concept
Designing and producing a photo book is a complex project consisting of a long series of decisions. The individual decisions (D:) are often interdependent, which is why we want to get an overview first. The best place to start is at the end: let's think about what to do last.
- Book construction. We require our book to open in such a way that the double pages lie flat and stay that way when the book is opened. This is achieved by the traditional hard bound construction named "case binding" consisting of a text block containing the pages and a case-bound (book cover), both equipped with a suitable mechanism. The block is "cased-in" into the cover, i.e. glued together to form the finished book. The typographic design of the cover is limited by the restrictions imposed by the photographer's DIY tools mentioned above.
- Cover material. The available means suggest using bookbinding linen (book cloth) as hardbound material. Cotton book cloth is easy to work with. At the same time, it guarantees that the hardbound cover fulfils its original purpose of protecting the block against damage. A whole linen hardcover is aesthetically neutral and, with the appropriate colour, is compatible with almost all contents. We will discuss the few typographic design options below. The book block consists of signatures that are sewn together with bookbinding twine. The signatures in turn consist of the printed folios, which are folded to the page format.
- Page format. Ideally, this results from the content of the photographic message, the mood of the images, the temperament of the photographer, in short, the artistic intention of the author. In reality, the existing inkjet printer will limit the choice of format.
- Paper. An important factor that must be taken into account is the grain (direction of paper fibers) of the paper. This must run parallel to the spine of the book, i.e. the side where the pages are bound. Papers for ambitious inkjet printing (fine art printing) are equipped with a special layer that prevents the ink from running. So-called PE papers, which have a plastic film between the ink-receiving layer and the paper backing, are unsuitable for book design. The majority of FineArt papers on the market are coated on one side. Normally one wants to design a book with content on both sides. This means that the sheets must be inkjet-coated on both sides. Unfortunately, there is not a large selection of double sided FineArt papers. These often carry the addition DUO in their name. The majority of them have a matt surface. Moreover, only a few of these come with a specified grain direction. I am only aware of two papers from Hahnemühle, Photo Matt Fibre Duo 210 gsm and Photo Rag Book & Album 220 gsm. Both papers have the ink receptive layer on both sides, the former has a slightly broken, natural tone, the latter is slightly more white, i.e. slightly brightened. If the grain direction is not specified, the only option is to try it out. A double-sided coated paper does not automatically have the grain direction that qualifies it for the current book project. Also, with inkjet papers, you cannot rely on the rule that the first paper dimension mentioned on the product label is the edge on which the fibres are perpendicular (i.e. perpendicular to the grain direction). A retailer told me that they make up and pack the paper in such a way that the least amount of waste is produced. Depending on the batch, there may be different grain directions. However, the labelling of the box is not dependent on this. When deciding which type of paper best suits the book content, you will therefore have to be prepared to compromise. Another factor to consider with double-sided printing is the opacity of the paper, as you don't want the image on the back to show through to the front. With 99% opacity in the Hahnemühle Photo Rag Book & Album, this is not to be expected. In addition, this pure rag (cotton) paper has a pleasant to touch surface that encourages leafing through the book. I recently tried a light white matt paper: madiaJET PhotoArt White Matt Duo 230 gsm. I was lucky, although not specified, the two DIN A3 packs had the required short grain direction. The opacity, though unspecified, resulting from 230 gsm and 0.3 mm thickness, yields no noticeable shine through. Touching it, reveals that it is not a rag paper. But the price is favourable.
- Page layout. Long before the invention of book printing, already in the early Middle Ages, pages were artfully designed. For example see the Book of Kells, which was created around 800. The arrangement of the text and image elements was carefully explored and adapted to human perception. In the course of this development, rules have emerged, especially for the arrangement of text, which are aimed at good legibility - the typographic rules. A photo book will probably contain mainly pictures. If longer texts are included, I think it would be appropriate to separate them from the pictures. A content rich text and a sophisticated picture "speak" to our perception in unrelated ways and are "read" in disparate ways. For that reason I would place the text on the left-hand page and images on the right-hand page. For the text, we then can apply the typographic rules concerning the page layout geometry. Typographic rules for image-only pages are fairly free. After all, an image is not read word by word. It is scanned by the eye in a complicated sequence, so to speak. The viewer should be able to let the respective page take effect on him or her without strain; in fact, he or she should be drawn into the pages. If this succeeds, we speak of harmony. In this sense, the structure of the pages should be visually harmonious, or at least appear uncluttered. Visual harmony is difficult to grasp. For the design of a type area, this was examined and even expressed mathematically. Quote: (Jan Tschichold, Willkürfreie Maßverhältnisse der Buchseite und des Satzspiegels, Basler Papiermühle, reprint, Basel 1992. Digital version of the original in the German National Library, see also M. Kohm, KOMA-Script, Lehmanns Media GmbH, Berlin, 2014, H. P. Willberg und F. Forssmann, Erste Hilfe in Typografie, Verlag Hermann Schmidt, Mainz, 1999. The layout of an illustrated book, however, is more open, which has to do with the processing of images in the brain. The extent of this openness can be seen by looking at a number of current photo books. A current collection can be found in the PhotoBookMuseum in Cologne, for example. In a well-stocked bookshop you are sure to find interesting examples. Many insights can also be gained from the web pages of the Bristol PhMuseum and its book festival, Books on Photography. Obviously, we have arrived here in a field in which not only the content statement and sense of space have to be balanced. Questions of taste and fashion will also play a role.
Specific example "Portfolio"
At this point, I would like to be specific. In the following we discuss a book project such as a portfolio, a short reportage, a chronicle, a memoir, something personal, something private, or a short story. Accordingly, we keep the layout simple and clear. This will also streamline our printing process.
- Format. After careful consideration, we decide to realize the project in the form of a whole cloth-binding in A4 page format on Hahnemühle Photo Rag Book & Album 220 gsm. A 17" Epson printer can be used to print a double-sided sheet, i.e. DIN A3. Hahnemühle specifies "short grain" for this paper and format, i.e. grain direction along the short edge of the sheet. This fits well, as for the book we will fold the A3 sheet along the short side, i.e. the later spine. So, page size A4, folio size A3.
- Number of folios per signature. A signature consists of a number of folios that are folded and shuffled into each other. Given the thickness of the selected paper more than 2 sheets per signature would be difficult to process. More than 2 would also lead to a displacement between pages that would have to be taken into account in the print layout. We therefore opted for 2 folios per signature (resulting in 8 book pages).
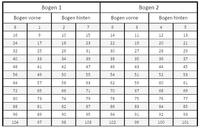
(As an alternative: printing on scheets of A2 format, a full signature can be printed on one sheet. But in this case, make shure that the paper sheets are long grain!) - Page sequence for the layout. Shuffling two A3-folios into each other to form one sequence results in the page printing sequence shown in the table:
- Size and placement of the images and, if applicable, text. This is where the typographical concept comes into play. Right from the start, we must bear in mind that later trimming will reduce the book block size by approx. 3 mm on each of its 3 sides (head, tail and fore-edge). This is particularly important in case an image extends way to the page edge. Of course, layouting a book project would be a task that normally is handled with a layout program such as InDesign or Scribus. This is almost unavoidable if the project is to be handed over to an offset print shop. In such a case, we would have to dive deep into the matter of CMYK-print process color management. This, however, is a topic that extends into the pre-press business and cannot be dealt with here. We therefore limit ourselves to a workflow and layout concept that can be mastered with the RGB-tools at disposition of a photographer, such as Photoshop. As shown above, there are good reasons for placing longer text T passages and images I on their own separate pages. With this in mind, we get the following layout cases for left page - right page positions: T-T, T-I, I-I, I-T. To my taste, I prefer to avoid I-T. Therefore only three cases are considerd.
Case T-T: This is the normal case in letterpress printing. The text is set in a field called "type area". A typographical rule states that the surface of the type area should take up approximately half of the page surface. Typographers consider Villard's construction of the page area to be "harmonious": Regardless of the page format, the page height as well as the width are divided into 9 parts. This division, which can be carried out using only the ruler as outlined below, is called the "harmonic division canon of Villard de Honnecourt". Villard was an architect and lived in the first half of the 13th century. The question of the aesthetic design of a text page is also an issue in software based text typesetting. Anyone interested in this can find detailed insights in the description of the KOMA-Script program package by Markus Kohm.
Font and font size: The font size is selected so that one line holds 65 - 70 characters. Which font suits a certain project is an intricate typographic question. A good discussion can be found in the booklet by Hans Peter Willberg and Friedrich Forssmann, "Erste Hilfe in Typografie - Ratgeber für Gestaltung mit Schrift", Verlag Hermann Schmidt, Mainz 1999.
Case T-I: If extensive text is assigned to some or all images, I would opt for a "uncluttered" layout, placing the text on the left in a type area, as in T-T, and the image on the right in a square area, e.g. 175 mm x 175 mm, in which portrait as well as landscape formatted images are placed. Where the image area is placed on the page is a matter of taste, as its position relative to the text area. If the text is set in a relatively bold font, the type area will appear dark. Choose a font weight so that on average the type area is in balance with the adjacent image area. Try it out.
Case I-I: This will probably be the main case for a portfolio book. As a rule, there will be one picture per book page: Picture area square as above so that both, vertical and horizontal images, can be fittet into. As a rule, a short caption, e.g. picture title, date, etc. will be printed with the picture. I would place this caption as far away from the image as possible, e.g. at the bottom of the page. In my opinion, it looks concerted if this caption and the page number together appear as a small visual element centered in respect to the image area at the bottom of the page.
If, exceptionally, several images have to be placed on one page, the area square can be divided into a matrix with identical sub-areas, e.g. 2x2. If this is not enough, the image area can be extended by one matrix row to 3x2, 3 rows and 2 columns. The matrix format looks balanced if a small white border separates the images.

FIGURE: HarmonicNineDivisionAfterVillard
Back to the portfolio concept. When a double page with adjacent pictures is opened, the picture on the left automatically faces the picture on the right. Without us wanting to, this viewing situation subliminally combines with the question: What is the relationship between the two pictures? This is unlike an exhibition, in which visual relationships can purposely be organized by grouping, for example. Thus the picture in the book on the left should bear a relationship with the one on the right, however little it might be. It could be a formal one, or in terms of content, obvious or subtle. When uncovering the relationship, the viewer's subconscious will reward him or her with a small portion of happy hormone. If we happen to have a picture without counterpart relationship, then in my opinion, it is better to leave the opposite side blank.
I am not aware of any "rules of harmony" for the "area" in which the pictures are placed. If you look at good photo books, you will see that the overall athmosphere determines the placements: tension in the image composition can be emphasized by the page design (e.g. image pulled to the edge of the page) or neutralized (e.g. generous white margin). Here we have opted for a neutral atmosphere.
- Image area. In a portfolio, I would generally present images in portrait format on an equal footing with ones in landscape format. This means that the images are the same size in both cases. The pictures also need enough space "to breathe". Sufficient white space around the image ensures that one side does not dominate the other. Exceptionally it could happen that you want to feature a picture over an entire double page. In our case of a handmade book, it is convenient to place it on one of the inner folios, where the stitching thread runs. The twine will be visible, but the left and right halves of the image will merge seamlessly. In our example, this would be the double pages on folio 2 at the back.
In summary, all this results in the following layout of a DIN A3 folio:

FIGURE: Folio layout
The craftsmanship
There are some good videos in the net about the tricks and pitfalls of the trade. Helpful are e.g:
- The six tutorials of "Windsaw"
- The series of the bookbinder Franja
- The series by the bookbinder "Heidi leimt"
I also like to be inspired by the reference book by Fritz Wiese, Der Bucheinband. I bought the fourth, revised edition, which was published in 1964 by Max Hettler Verlag Stuttgart, from an antiquarian bookshop. The 7th edition is currently in bookshops.
MAKING THE BOOK BLOCK
Once you have decided on the page layout and designed the title page, bastard title (1 recto), etc., the pictures can be printed according to the TABLE printing sequence. The printed folios are left to dry and rest for at least 24 hours. Subsequently the folios are folded (cotton gloves are advisable) and shuffled into each other to form the signatures. In our example, there are two folded folios at a time, which form a sequence. All the sequences are then stacked and pressed for a further 24 hours.

FIGURE: PressWithSequenceStack
I built the press myself. I bought two multiplex boards 250 mm x 400 mm (birch or beech, thickness 18 or 21 mm), a threaded rod M8, nuts, star grip nuts (alternatively wing nuts) and washers from the DIY store. I drilled the boards, sanded them smooth and painted them with clear varnish. It is best to choose a water-based varnish that does not evaporate solvents that could contaminate the prints.
Note: Folding or creasing? Folding means folding with the help of a tool, in this case a folding bone. If the direction of the paper runs along the folding direction, photo paper can be folded with the folding bone up to a thickness of around 0.3 mm. If you proceed carefully, the Hahnemühle and mediaJET papers mentioned above can be folded with the folding bone. Thicker papers, or if the grain direction is at right angles to the fold, should be creased before folding. The simplest way is to use an empty ball point pen or a bone folder on a soft mat.
But once again, grain at right angles to the fold is a no-go! As you turn the pages, more and more of the crosswise fibers will break and soon the page will tear. The book is then ruined.
The signatures should now be sewed to form a block. To do this, we choose the "sewing on tape" method. The cotton tape is available in different widths. I use one with a width of 12 mm and a linen bookbinding twine with a strength of 30 Nm. The first step is to pre-punch the sequences with an awl. To do this, make a template on which the position of the punctures is marked. Here is a suggestion for four tapes for a DIN A4 format, i.e. spine length 296 mm:
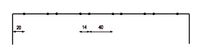
FIGURE: Pre-punching template
Using the template, each sequence is now pre-punched from the inside with an awl. The direction of piercing is important, as this creates small edges at the holes on the outside of the fold, which later prevent the glue from penetrating the inside of the signature sheets. I use a 10 mm thick foam rubber pad as a base for pre-piercing. The picture below shows this with the template sheet, the roll of twine, the bookbinding needles, a piece of beeswax and the awl. Next to it you can see the pre-piercing process. Prick all signatures in this way.

FIGURE: StitchingToolsPre-piercing
We stack the pre-punched signatures, with the last one on top. You could now glue the endpapers onto the first and last signature. But you can also glue in the endsheets after sawing. The endpapers are the first pages that follow the front and back of the book cover. The endpaper connects the book block to the book cover. The endpaper is subject to heavy mechanical stress when the book is opened and closed and should therefore be of good quality. There are special endpapers. I prefer the ribbed, "Vergé" paper, Laid paper, with approx. 120 g/sqm. The color should match the paper tone of the block or the color of the book cover, but can also contrast with it if it is compatible with the contents. It goes without saying that it is extremely important to keep the grain direction parallel to the fold. What is also very important: The endpaper should not curl when gluing, as it will be pasted with glue over a large area when the block is cased in. It is advisable to try out beforehand how the paper behaves when it is pasted with glue.
Make the endpaper
Cut 2 sheets of endpaper with the correct grain direction in the format of a folio (here DIN A3). Fold in the middle. The two endpapers are now placed one behind the other along the folded side, covered by a wastepaper sheet, each offset by 3 mm.

FIGURE: Attaching the Endpapers
Coat the uncovered 3 mm strips with bookbinding (PVA) glue (I use Planatol BB) and place the endpapers about 2-3 mm behind the fold of the first / last signature and press on with the folding bone. Allow to dry and trim the excess endpaper flush with the signature.
Cardboard is fine as a cutting mat. I use a special plastic cutting mat that allows the cuts to heal themselves. Cardboard tends to form furrows over time, which, if you are unlucky, can lead the knife in an unwanted direction.
Now we are ready to sew. For this we need a soft mat (e.g. sponge rubber), twine, beeswax, cotton tape and a needle. Stack the signatures in a pile, with the last sequence on top, as we are starting with the last sequence.
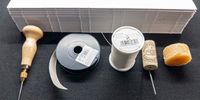
FIGURE: Stitching Material
Next, we cut the strips of sewing tape (tape length: height of book block plus 6 cm) and a piece of twine about 2 m long, which we pull over the beeswax block. This will make the twine a little stiffer so it will stick better when you need to knot it.
Sewing the first two sequences
Thread the twine into the needle and prick into the first sequence (which at this moment is the bottom one of the book) from the outside at the first hole, then thread the twine from the inside to the outside at the next hole. Now take the thread around the first stitching tape and immediately back into the sequence at the next hole, and so on until the end of the sequence. Now pick up the next sequence (verify the correct page alignment) and take the thread back to the other end of the sequence in the same way. We must always be careful not to accidentally sew on a basting tape. They should be moving freely when pulled back and forth under the thread. Now the beginning and the end of the thread are opposite each other. Before knotting these two ends, carefully tighten the twine on the inside of the sequence. Connect the ends with two simple loop knots.

FIGURE: Basting the First zwo Sequences
Sewinging and tying the remaining sequences
Take the next sequence from the stack (always verify the correct page alignment) and pass the thread through the other end in the usual way. Here we pull the thread tight and interlace the end with the sequence underneath. It is important that the single knot is interlaced as shown in the picture below. Each subsequent sequence is attached in the same way.
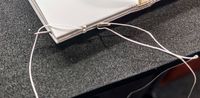
FIGURE: Interlacing
Adding a New Thread
At some point, the thread will run out and we will need to add a new piece. The best way to interlace the two threads is with weaver's knot. The place to hide the knot is where the thread comes out of the sequence, before a basting tape. Never should the knot be visible inside a sequence.

FIGURE: Weaver's knot
Stitching the last sequence and trimming, headband and stitching gauze/mull
At the end of the last sequence, simply bind twice. The book block is now sewed. Now I clamp the block in the press, with the spine of the block protruding a few millimeters. The stitching tapes should now be tightened so that they lie very tightly under the twine. Now carefully coat the back of the block, the thread ends and the stitch holes generously with PVA glue sweeping from the inside out, and leave to dry in the press. The block is now stable enough to be trimmed. I go to a bookbinder or a good copy store and have the three sides (head, tail, and fore edge) of the block trimmed with a motorized knife. You can also plane these three sides yourself with sandpaper. If done correctly, a beautiful, even shiny, surface can be achieved, but this requires a lot of patience, some experience and flair. Using a vacuum cleaner is highly recommended.

FIGURE: Block spine
Note: I describe here the make of a book with a "flat back". Alternatively, you could make a book with a "rounded back". In this case, the spine would have to be rounded. With the thickness of the photo paper of approx. 0.3 mm and over 200 gsm, round tapping is very difficult. An inexperienced person like me would damage the block more than round it.
Now attach the endbandsat the head and tail ends of the spine. I use an industrially made endband that I cut 2 cm longer than the thickness of the book block and glue it on. After drying, the excess tape is trimmed off with scissors.

FIGURE: Block, Mull, and Endband
The endband could probably be dispensed with, as it plays no role in the "book mechanics". Its purpose is to prevent dust from entering between the book cover and block if the book stands unused on the shelf for a long time. It also has a long tradition and looks good. The bookbinder will certainly provide a piece in the desired color.
The block is attached to the book cover via the stitching tapes. To reinforce this crucial connection, we add a stripe of mull. There are single and multi-threaded mulls. Here I use a 3-thread mull, as the block weighs over 2.5 kg with almost 200 pages. The mull is cut so that the 3 warp threads run perpendicular to the spine. It should reach to the head and tail as far as the headbands and protrude about 4 cm to the left and right. Attach this piece of mull to the spine with a liberal amount of glue. Stretch the mull over the spine and massage in the glue. Leave to dry.
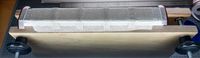
FIGURE: Block, spine with mull in press
After drying, cut the protruding stitching strips and the gauze to the same overhang (20 - 25 mm) and glue them to the paste down side of the endpapers underneath. Here, use glue sparingly as this connection is mechanically not important. Too much glue will only cause the endpaper to curl. If the endbands still protrude, trim them off flush with the block using scissors. I now clamp the block back into the press and allow it to dry thoroughly. The block is then finished.
MAKING THE COVER
Important: Make sure that the grain of all materials runs parallel to the spine! The hard bound cover consists of the book covers made of gray cardboard (bookbinder's gray cardboard, approx. 2 mm thick), the linen cover (bookbinder's linen), a spine stiffener (Bristol board) and its counterlining (e. g. Vergé) and a board connector made of a material that is resistant to bending, e.g. Jaconet (Canbric, "shirting").
We start by cutting the cover boards and the spine stiffener. Add 3 mm overhang at the head and tail of the block, and keep to the width of the block. We will trim the precise width later. I then sand the cardboard edges with 240 grit sandpaper. We cut the spine stiffener and its counterlining
as long as the covers and as wide as the book block is thick. For the inlay I use a dense Bristol board, approx. 1 mm thick (any dense and stiff cardboard material is OK) as the material for the spine stiffener and glue approx. 100 gsm paper (end paper OK) to it as lamination. Now glue this inlay in the middle of the shirting strip; press down and press on the edges with the folding bone. After drying, glue the inlay to the cover boards, observing the hinges width of 7-8 mm and orientation (gray cardboard on top - inlay opposite), see sketch. Let dry.

FIGURE: Cover construction
Now place the book block in the folded raw cover, center the block and press it carefully against the insert in the spine. Then in this position open one cover.

FIGURE BlockOnRawCover
We can now see the overhang of the cover under the block and can mark what is protruding too much. The overhang on the long side should be about 3-4 mm, i.e. about 1 mm more than on the head and tail. Cut the cover to the so determined width.
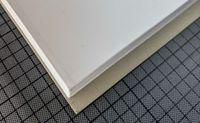
FIGURE: Trimming the board overhang
The raw cover can now be covered. I choose bookbinding linen in a suitable color as cover material. The surface should not be too smooth, as any irregularities would be immediately visible. A raw linen surface is most tolerant to beginner's mistakes. Bookbinding linen comes laminated with a layer of paper. Here, too, it is important to respect the grain direction. The grain should run parallel to the spine. The raw cover serves as template. From it we add a 15-20 mm overhang all around. If something goes wrong later when gluing, we have a little reserve and can still make corrections.
Glue for the cover and casing-in.
White PVA (polyvinyl acetate) adhesives, such as Planatol BB, dry more quickly than the inexperienced would like when working on large areas. In order to be able to proceed more comfortably when pasting the cover and later casing-in, I mix a special glue-paste-cocktail. On the advice of a bookbinder, I mix 1 part wallpaper paste (methyl cellulose MC) and 1 part PVA glue (e.g. Planatol BB). The more MC, the more time you buy. I only mix just as much as I will need. Leftovers of this mixture can be stored for about 1 week in jam jars that can be sealed well.
Note: Wallpaper paste is made from methyl cellulose, but you can also use paste made from wheat starch. Both are organic materials which, when mixed with water, are very susceptible to bacterial and fungal attack. PVA glues would be too, but the better ones contain protective additives, which also makes the cocktail more durable. If you want to reuse leftovers, check them first. Dispose of foul-smelling or discolored glue mixtures immediately.
Covering the raw boards
This can be done in two ways: Paste the linen with the glue-cocktail and lay the raw cover on top, or paste the raw cover and lay the linen on top. Bookbinders do it the first way. I have tried both. Despite good instructions glue residues from my fingers usually ended up on the linen or the linen curled up or there were bubbles in the cover that could not be smoothed out.
So I tried the second way, and always weared an apron on which the fingers can be wiped. First I pasted one side of the raw cover. As it is made of a firm cardboard, nothing rolls and you can wipe your hands and find the position on the cover in peace. Take your time, turn the piece over and use the folding bone to smooth the bubbles to the edge and away. Take care: Sensitive coating materials can get shiny marks; better place a sheet of paper in between. Next put the workpiece linen down, paste the inlay and ca. 2 cm of the cardboard, an let it fall on the linen. With the folding bone press and smooth the linen, and mold the edge at the hinge. Again, use a waste paper between folding bone and linen. Turn the piece over, but make shure the work surface is clean, then the linen will lay on it. Paste the hardcover and lay it down onto the linen, smooth out bubbles, etc.. Now work the fold again with the folding bone.
As next the tuck-ins of the cover are to be folded over and glued on. But before, cut the linen corners at an angle just missing the cardboard corner by 3 mm. This little excess linen will allow us to form a pocket into which the cardboard corner is hidden, "clipped in"; see here
Now apply glue on one of the long tuck-ins, allow to dry briefly and fold over. It is best to work on the edge of the table, and with the fingers pull the wrap tightly over the edge. (For that you can use the pure PVA glue). Always be careful not to spread any glue from your hand onto the linen. Always have a cloth nearby. With the folding bone nip the linen corners to hide the cardboard corner. Now fold in the opposite tuck-in, nip it, and then the short sides. The book cover is now finished and can dry. It will warp a little as the cardboard has not yet been counterlined. You could place the cover between two boards and weigh it down.
Usually one wants to be able to identify the front of the book without opening it. That's why that I mark the front cover with a title label or a suitable, characteristic symbol. To place a label, I emboss a dent of suitable size into the front cover in which the label can be positioned. Alternatively I print a linocut symbol or stencil spray it on the front cover side. Or, if desired, a master bookbinder could emboss a title text into the front cover.
CASING-IN THE BLOCK
Preliminary
Caseing-in is performed by pasting the outer pastedown side of the endpaper. Often the endpaper material expands 1-2 mm at right angles to the grain direction. I therefore now trimm 2 mm off the long side of both pastedown sides.
To prevent glue from getting onto the block below the pastedown, I will now prepare two large enough wastepapers that will be placed between pastedown and flyleaf. After casing-in the book is placed in the press. To prevent moisture from diffusing from the hardcover into the book block, I will place a sheet of impermeable paper, like baking or sandwich paper, between the pastedown and flyleafs. I now prepare these two sheets. To verify the following steps, I place the block in the cover. Make sure that the upper side of the block is below the hardcover front. Position the block in the middle of the hardbound and press it against the spine. I then press this ensemble for one night. So not only the book relaxes before beeing cased-in, but also my self.
To avoid any surprises, try out how the endpaper reacts to pasting. Paste a test page of endpaper and watch how and how fast it bends. Often it flattens out after the glue moisture diffuses to the back side. If it stays curled, try with a glue cocktail containig less PVA-glue and more MC-glue. It is also advisable to perform a "casing-in-dress-rehersal" through all manipulations. Avoid unnecessary movements. Otherwise you risk glue getting onto the hardbound, leaving there ugly stains. They can not be removed anymore!
Casing-in for real
The next morning: The glue cocktail, glue brush, all utensils are ready. Check again that front of the block matches front of hardbound. Position the block in the middle of the hardbound again and firmly press the spine of the block against the spine of the hardbound; place it on the prepared work surface. The block should now lie exactly as in the final book. Nothing is allowed to slip from now!
Carefully lift off the front cover and slide the protective sheet under the pastedown page of the endpaper.

FIGURE: Ready to casing-in
At this point, it is advisable to watch the videos on mounting again; 1, 2, 3. and take a deep breath.
Paste the pastedown page sweeping from the center to the edges, pressing down on the block with two fingers. Stay concentrated and calm, even if it does not run smoothly. If the pasted endpaper curls, wait - it will flatten eventually. Clean the hands. Now carefully pull out the protective sheet, hold up the front cover with one hand and press the back part against the block, while at the same time pressing the block on the long side with the other hand. Drop the front cover onto the pasted endpaper. Press the cover down for half a minute, unfold and smooth with a folding bone, carefully pressing also the parts near the spine where the mull and tapes are, as there is where the mechanical connection between the textblock and the hardbound is made. Cover the book with a board, weigh it down and leave it to dry for a few minutes before working on the other side in the same way.
With the glue moisture has been introduced into the frontside and backside endpapers. This moisture should not be allowed to diffuse into the book block. As diffusion barriers, the prepared impermeable papers are now placed between the hardbounds and the flyleafs. Now the book can be placed in the press and left to dry out overnight.
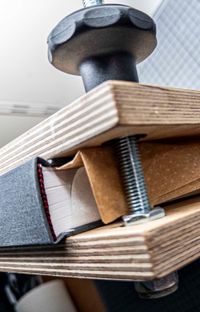
FIGURE: Final pressing
Note straight vs. round spine
Here I described how to bind a book with a straight spine. Casing-in a book with a round spine would be less tricky, as the round book spine is attached to the hardbound via a sleeve. Usually the sleeve is glued to the textblock just after the mull. Then, when casing-in, as first, the sleeve is glued to the hardbound, making the ensemble less sensitive of getting out of place while pasting the pastedown-hardbound parts.
With a round spine, the spine stiffener would have to be made from a less stiff but suitably flexible material so that the mechanism with the sleeve can work. Unfortunately, a book with a straight spine cannot be sleeved. Unlike a round spine, the straight spine remains straight when the book is opened and the sleeve would inevitably tear open. However, since rounding a book block consisting of our thick photo paper is beyond my manual skills, I opted for the straight spine.
Additional information
- Bookbinding material in Germany and Switzerland is available from Boesner. www.boesner.de
- Casing-in the textblock, see Kristi Warren:
https://www.youtube.com/watch?v=rJMvwW_wZBY - https://en.wikipedia.org/wiki/Bookbinding
- https://www.youtube.com/watch?v=o8QV7bV93Sg
- https://www.ibookbinding.com/blog/fundamentals-of-bookbinding/